So, as I pack up for three weeks on the road:
PMEA (Pennsylvania Music Educators’ Association) Conference
& 3. The Outbound Hope Mission LARP
I had two choices. Either set myself to vacation mode or put together a mobile recording rig to make sure I can record wherever I am and deliver a client-ready recording.
Am I nuts? Of course. But do we as voice actors do this all the time? Absolutely. I’ve seen pros that make six figures in setups that would make tech-nuts like me vomit, like zip-tying a shotgun mic to a car’s headrest under a highway overpass, surrounded by suitcoats on hangers. But if it gets the job done, then so be it.
So here, I’m going to give you a rundown of MY personal travel rig, with links to everything. And it all fits in a single backpack. ALL of it. The only thing you have to supply after this is isolation.
You’re VSC AJ DeLong (Tech Admin)
You! Yeah, You… Have you needed gear on the go while still doing your voice lines?
But I’ll get to it later, because, just like with any other setting, the mic can change the solution.
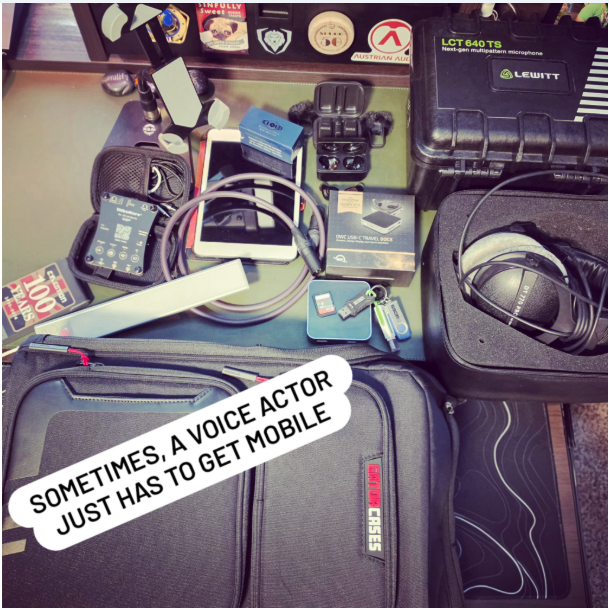
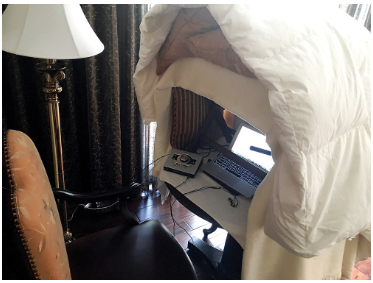
If you follow me on Instagram/Facebook (shameless plug: @beardedbaconvoiceoverguy), you likely saw this image this week. This is my rig, and it does indeed all fit in that backpack. And I don’t take all of it, because I don’t sling the Cloudlifter anymore, but I take it in case I go to a VO conference and another VA needs it. I LIKE being the guy with the extra stuff to help out. Put good out, get good back, always.
So, what do you NEED when recording on the road? Picture it in your noggin, just like your signal chain at home:
Mic (will you use your normal mic? Will you use a shotgun mic to travel? Something different?)
XLR Cable, which goes from the mic to…
Interface, which should have a USB cable that will go to your…
List of everything I’m Bringing:
Mic: Lewitt LCT640ts
Interface: AudioSigma Mike Hero DSP
XLR Cable: Asterope 6ft Gold XLR Cable
DAW - I’m running into my phone to record - Wave Editor
Headphones -Beyerdynamic DT770 Pro
In-Line Mic Pre (for SM7b/RE20 users) - CloudLifter Mini
USB/Storage Hub -OWC USB-C Travel Dock
Cell Phone Holder -K&M Smartphone Stand
Battery Bank - Wireless Battery Bank
Earbuds - Mackie MP2-TWS Wireless Earbuds
Backpack -Gator IconBackpack
Laptop/Mobile Device/iPad/ThinkPad/whatevermawho’sit - what do you have room/time for?
Headphones (closed back, or use ear buds for travel or the sake of saving space)
Desktop mic stand - something not too heavy, but a tripod tends not to support heavier condenser mics well
Cellphone/tablet holder/stand - I like having one for my desktop, makes it easier to read my copy
Storage - hub, thumbdrives
Portable chargers - you won’t always be in a place where you have an outlet, so make sure to have some way to keep that mobile device going!
THIS IS UP TO YOU:
What should you use? This is where a shotgun-style mic comes in really handy! They’re designed only to capture what’s directly in front of them, so random noise happening off to the sides is rejected, and you can get away with a slightly noisier environment with less isolation. I don’t own any, so I have to be careful. You dynamic/broadcast mic users out there (SM7b/RE20), you’re in a good spot, too! They’re not as sensitive as a condenser, so you’ve got wiggle room as well.
For an interface, especially for travel, you want to make sure it won’t rely on plugging into a wall. So, look for one that is BUS Powered, meaning it draws its power from what it’s plugged into (i.e., the laptop/mobile device). Most boxes/specs will tell you if they’re iOS-compatible; that’s usually a good sign they’re good for this application. IK Multimedia makes a lot of them for this, along with Focusrite’s Scarlett Solo, UA’s Volt 1, and a few other 1-channel interfaces. However, those draw significant power, so be careful. If you’re in a lot of other voiceover circles, you may have heard of Fernando Pires’ neat little interface, the AudioSigma MikeHero DSP. It’s MADE for us, and is a fantastic travel interface. There’s a good chunk of folks that use it as their main interface as well, but I’ll stick to my Apollo, thanks.
Mics
If you’re using a laptop, obviously you can just use whatever it is you use every other day. For iOS or Android, however, you don’t have ProTools or Audition or Audacity anymore. Bummer, right?
So, here’s what you’ve got for your phone or tablet (and I look for things that are more geared for VO):
iOS: GarageBand, BandLab, Dolby ON, Voloco, VocaLive CS
Android: BandLab, AudiosDroid Audio Studio, Wave Editor, Dolby On, N-Track Studio
WAVE EDITOR comes strongly recommended by “Such a Voice”, which is a pretty good authority of pros.
For your recording
How to Carry it all
So, what to carry all your stuff in… this can all get pretty expensive. It’s an investment that you want to protect however you can, right? You don’t want to wrap it up and call it a day, right? There’s plenty of heavy-duty options out there, from Mono Cases, SKB, Magma, D’Addario, Gruv Gear, etc. After going through a LOT of checks, I ultimately went with the Gator Icon series. It just had a lot of the features I wanted, and everything fit. Everything.
Thick padding, waterproof (inside and outside compartments), extra D-rings, TWO laptop sleeves so I can bring my normal work laptop with me as well, a “secret back” compartment, and a laser-etched QR code that you program with your info in case it’s lost so TSA or airlines can scan it and it’ll pull all your info up and send it right on home to you. And there’s a bottle opener on the strap ;)
Isolation
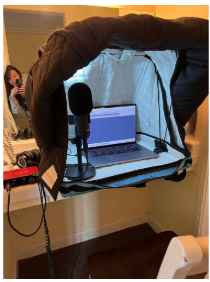
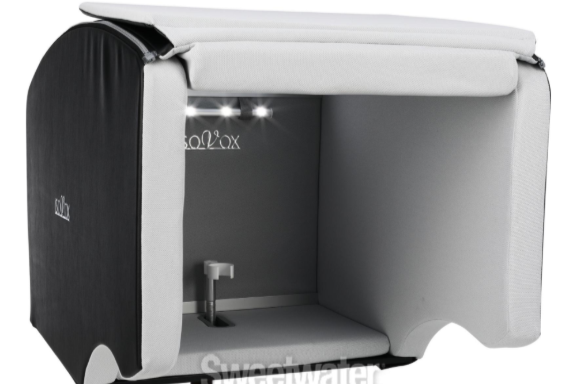
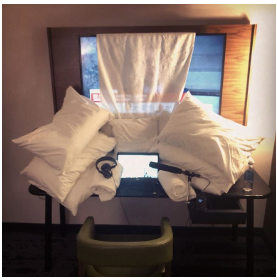
What do? IsoVox makes these expensive things you can put on mic stands that travel well, and you literally stand up and they go over your head (I’m trying one out next week, I’ll let you know how that goes), but they’re really expensive, and I think can be cost prohibitive to folks that aren’t doing this full time.
Most of us end up doing pillow and blanket forts. Yep. Seriously, just like when we were kids. If it works, it works. Make sure you have your reflections handled, and you’re good. If you’re using a shotgun, you can get away with… less.
If there’s a good closet, get in there and start hanging the suits and comforters.
Well, that’s what I’ve got.
I think I covered it.
If you have questions, hit me, I’m here for it.
Written By: AJ DeLong
Edited By: Grant Peevyhouse
Last Edited: 04/26/2026Visualizing with Audio: Seeing the Story in Your Sound Designs
Take a moment, wherever you are. Stop, get comfortable, and close your eyes. Slow your breathing and just listen. Soon enough, your ears will begin painting a picture of your surroundings. Once your hearing has taken over and you’ve settled in, ask yourself: what do I hear? Let your analytical brain identify each sound: where it is, how far away it feels, what’s between you and the sound, and what story the sound is telling.
Okay, I know this sounds a little crazy, like some kind of meditation silliness. I promise, It’s not. It’s a method to elevate your sound designs beyond a few samples on a timeline to truly immersive audio storytelling.
Still with me? Haven’t quite picked up your phone yet to scroll cats on Instagram? Great! Suspend your disbelief for a minute and let’s try it together.
Imagine this: we’re sitting on a park bench on a sunny June day in Colorado. What do we hear? Eyes closed, no peeking—just listen. A dog barks. Good start. A plane overhead. Then crickets, water bubbling from a nearby stream, traffic in the distance. We’ve identified the sounds, but each one carries so much more information with it. What do we really hear?
Sure, the dog barked, but where, and why? Off to the left, maybe 25 feet away or so. It’s a sharp bark, followed by some satisfied little dog wuffles, from what seems like a medium-sized dog. Maybe a young Golden Retriever? Then, shuffling in the dirt, followed by something moving quickly through tall grass. A rabbit, maybe. The dog sniffs, paws at the ground, whines, then reluctantly starts to walk away from the grass. Alone? No. There are footsteps. One set. No, two sets, a couple. What are they walking on? Concrete? Gravel? Loosely packed dirt? Are they shuffling along in sandals, sensible walking shoes, or statement-making stiletto high heels? All of this is useful information to our brains to complete the picture.
The collar tags clink, the leash shifts with a corrective tug, the dog pants in the heat. A little satisfied laughter from the owners, a little conversation. The whole moment drifts from left to right and fades away into the open park, softened by distance and breeze.
Every sound in the scene tells its own story. When we design a scene, we start with a blank timeline and must tell that story ourselves. Dropping a dog bark on the track is a start, but the real work is shaping everything around it: context, movement, environment, meaning. This combination of all these little details makes the scene come alive. Remember, your listeners’ brains want to paint a picture of the scene, to fully flesh it out and live in that world you’re presenting, so it’s up to you to give them as much help as you can.
We could continue on with this same exercise for each element in the scene. Take the plane overhead: does it somehow hover in place, or move across the sky from right to left, behind to ahead? Is it climbing? Descending? Is it a growling B-52 bomber or a sputtering single-engine Cessna? You get the idea.
When I start a sound design, sure, I lay out the dialogue and place the clips where they belong. But then I read the script and listen to the takes, paying special attention to the story being told through the dialogue. Sometimes the script helpfully gives you sound cues, setting, and texture throughout. Other times it gives you nothing at all, and the world is completely yours to invent. In either case, the exercise is the same: listen, consider, close your eyes, and let the scene come to you. Let your mind tell you what should be there. Write it down if you can, but at the very least, stay in that moment long enough to really hear it, to connect with it, and be part of it. Do this multiple times throughout the edit.
Sound design is more than editing clips, applying some compression, and normalizing the final draft to -16 LUFS. It’s a creative process, one of storytelling, of building, shaping, refining, and crafting a world through audio, and the more fully you inhabit the world you’re creating, the more complete and compelling your design will be.
If you’re still here reading this, awesome. I truly hope this has been helpful. Maybe it’s made an actual impact. But hey, don’t just take my word for it. Try it for yourself. Close your eyes and open your mind for just a moment. Live in your world. I can’t wait to hear what you come up with.
Written By: Daniel Kelley, Lead Sound Designer
Edited By: Grant Peevyhouse
Last Edited: 06/02/2026Thanks for reading the Newsletter
Make sure you check out everything else
Thanks for reading the Newsletter Make sure you check out everything else
VSC (Voice Support Community) is here to support you. Make sure to be a part of the discord community.